Photography tips
1 Shoot a lot. Two ways of doing this are walking around with the camera bouncing on your stomach waiting for something to happen and the other one is putting aside time for a session. I’m a believer in the second because if, say, you’re on holiday, finger never leaving the shutter release, your keen artistic eye always scanning for that special moment then your travelling companions will probably drop you down a well. I think you get better shots if you take 20 minutes, work your photographic magic with all you’ve got then join back in with the living. A session means coming up with more than your first couple of shots. It means pushing it. Changing background, angle, lighting, distance, going on when you can think of nothing, pushing yourself and then taking that final last careless grabshot which is usualy the one that will have everyone telling you how sensitive and artistic you are. There are high level photographers who have low-level family shots because they extend themselves at work and at home one or two shots will do. It’s better to act like a pro and make it a, throw yourself all in, work session.

2 Shoot like a pro, well a couple of pros. Find your talent by seeing which style makes you shine. If you’ve got something lined up shoot it in three different ways. Firstly your best shot, the one you think is most creative or most saleable. Next your wild, dumb, break the rules shot. Swing the camera around, climb a tree, blur it, shoot a small part of the subject, chuck a bucket of water at the subject, that kind of thing. Thirdly, and this is tough, shoot innocently, no thinking, like when you first took your first camera out of the box and photographed your foot. Like a wide eyed child. One of these styles will be tough for you. Concentrate on that one. One of my kids shoots in style #3, I break out in a sweat when I try to do it and one day I hope I’ll be as good as her.
3. Find photographers you love and duplicate them, you learn by doing something different. Plus you just may be the genius of something you’ve never considered, food, aeriel, pets, sport, who knows until you try and someone’s got to do it. Here are my personal idols
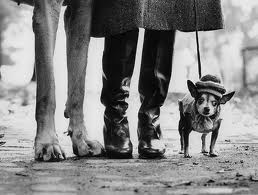
I love Elliot Erwitt, the master of the visual gag
and Sebastio Salgado who does raw emotion for breakfast

and Shinzo Maeda who I want to be when I grow up

4. Read the camera manual and then turn the dial off auto. While 95% of other photographers don’t know how to select exposure you’ll be laughing in your beer when you’re the only one who doesn’t have pitch black silhouetted subjects, white sunsets and blurred lowlight shots. Plus you’ll be doing long exposures and nighttime work and you won’t be pointing the camera in difficult situations and relying on the power of prayer.

5. Learn natural lighting. Where is the light coming from? If you’re out in the open in midday it’s coming from above which means deep shadows under the eyes. Move the subject under a tree branch and you’ve cut out this down light, it’s blocked by the leaves, and now you’ve got nice flattering direct light. Move them next to the tree trunk and now you’ve blocked the sidelight on one side of the face as well as that miserable top light. Very artistic! And avoid direct sunlight. It means squinting and harsh shadows. Of course if you’re shooting skateboarders forget all this and shoot straight into the sun any time you like.
6. Double chins, get the person to lean forward from the tummy, and shoot from high. A Roman nose, the nose will point slightly in a direction, shoot from this direction for less Rome. Small eyes, sit them down and shoot from above and get them to keep their chins down while looking up and you’ll get big eyes. To find the better side of the face, look for the vanishing point, if you draw a line through the eyes and the mouth it will meet, shoot from the other side. Big jaw, frame the face with hair. And number one is that the cheek line is always more flattering than the jaw line, so you move the face around, or you move around the face until you’ve found that cheek line.
 See! Cheek line, always works.
7.Natural is best. In the words of my mother, not on your Nelly. Sometimes natural is good but be careful with this hoary old chestnut. Some people thrive in the studied considered set up as with the beauty tips above. Some are great responding to interacting and fun or being casual. And sometimes natural is good but oy, be careful. For example, with actors for the natural feel, set up a mirror behind you so they can see themselves. As soon as they get the Dash Riprock look they know it and you get them to wiggle a finger or something and you shoot away. My style is horseing around, enthusiasm and watching for what they do. It’s not Sebastio Salgado but hey, seems to work.
One response to “Photography tips”
Leave a comment
Recent Comments
| Yaron on Moshav Beit HaCholent | |
| Cluey Suey on Photography tips | |
| Irris on Harvest time and why my neighb… | |
| Cluey Suey on Harvest time and why my neighb… | |
| fress1 on Harvest time and why my neighb… |

2013 is my photo a day year…month by month…it’s a Facebook group called #amonthof…a great place to practise 🙂